At the end of last year I gave a talk on the Xamarin CocosSharp framework at the Queensland C# Mobile Developers meetup group. The aim was to give an overview of the framework and what it can do, and to provide a quick walkthrough of the code for a very basic game. The slides and code for the talk are available on github. The next few posts will take you through building the game and give you a flavour of how CocosSharp works and how easy it is to get started. This first post will give a quick overview of the game, introduce CocosSharp, and cover how to launch CocoSharp from your application.
The Game: 'Meetup Pop'
The game I used to showcase CocosSharp was a simple 'Balloon Popping' game, where waves of balloons appear from below the screen and rise to the top. The goal is for the player to pop the balloons by tapping them before they leave the screen, otherwise face certain doom in the form of the game over screen. At demo time, there was a small twist - instead of showing balloons, the game downloaded the rsvp list for the meetup using the meetup api and displayed profile pictures in place of the balloons.

|

|
I know right, this "game", if you can call it that, is no work of art. That said, it does demonstrate a bunch of the fundamental functionality you need to work with in CocosSharp, including:
- App Launch and Bootstrapping - windows, ios, android
- Scenes and transitions
- Actions and animations
- Sprites and labels
- Particle systems
- Touch handling.
So, let's have a look!
The architecture of a CocosSharp App
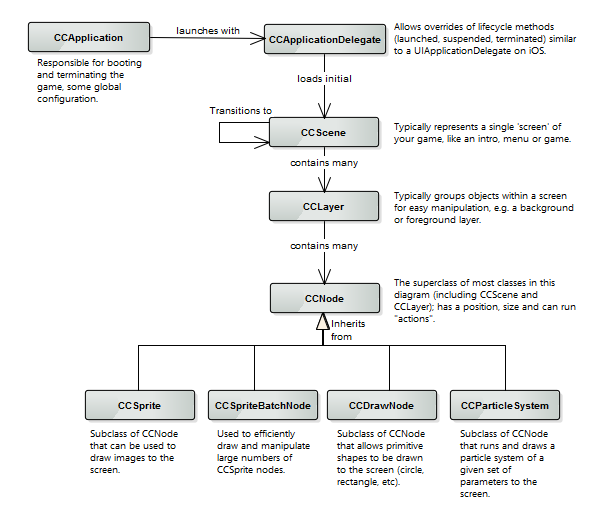
Before we look at any code, it's worth briefly providing a bit of context on the way the framework is structured and used. One of my favourite features of CocosSharp is that you can write all your game code in a portable class library (PCL). You can access the entire framework in the portable profile, and outside of the initial bootstrap code, there's no need for platform specific code in your solution at all. As CocosSharp supports a multitude of platforms (everything that MonoGame does - including iOS, Android, WinPhone, Win Desktop, OSX and more), this is pretty compelling. From the point of launching the game and handing over to the PCL code, the instance hierarchy looks something like this:
 I've included the subclasses of
 CCNode that are most commonly used as children of a CCLayer in the diagram, but there are more (and indeed, CCScene and CCLayer are subclasses of CCNode themselves). For an overview of class hierarchy itself, check the slides from my talk.
The architecture of Meetup Pop
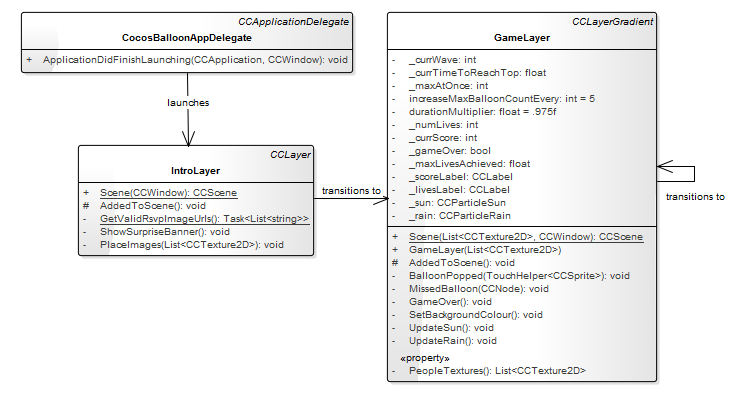
Now that we're clear on broadly how a CocosSharp app is put together, let's take a look at Meetup Pop. You won't be surprised to find that it's a very simple game, with just two scenes and the subclass of CCApplicationDelegate required to launch the intro.
 The
The CocosBalloonAppDelegate (subclass of CCApplicationDelegate) implementeds ApplicationDidFinishLaunching which is called when the CocosSharp game has launched. The app delegate launches a CCScene containing an instance of the IntroLayer, and things are ready to go. After the shocking balloon-to-meetup twist, the IntroLayer scene transitions to a new scene with the main GameLayer. After game over, the GameLayer loads a new scene with a new GameLayer, quickly 'resetting' the game stage.
With the overview clear, let's step through each part of the app. If you like, download the code and build it on your machine/device so you have a feel for how it all works.
Getting CocosSharp to launch
As I mentioned earlier, bootstrapping CocosSharp is really the only code you need to write in your platform projects. The code differs very subtly for each platform, but is very much boilerplate. For example, the code to launch meetup pop in iOS:
public override void FinishedLaunching(UIApplication iosapp)
{
    var app = new CCApplication { ApplicationDelegate = new CocosBalloonAppDelegate() };
    app.StartGame();
}
vs Windows Desktop:
static void Main(string[] args)
{
    var app = new CCApplication(isFullScreen: false, mainWindowSizeInPixels: new CCSize(768f, 1024f))
        { ApplicationDelegate = new CocosBalloonAppDelegate() };
    app.StartGame();
}
It doesn't get much more straightforward than that. From here on, you can write the rest of your code in the PCL - in fact, CocosBalloonAppDelegate() is also defined in the PCL.
In your application delegate, you must override ApplicationDidFinishLaunching and launch your first scene. You can also set a few configuration items such as the content search path, which we do here:
public class CocosBalloonAppDelegate : CCApplicationDelegate
{
    public override void ApplicationDidFinishLaunching(CCApplication app, CCWindow mainWindow)
    {
        app.ContentRootDirectory = "Content";
        mainWindow.RunWithScene(IntroLayer.Scene(mainWindow));
    }
}
And that's how you launch a game! Note that Scene(CCWindow) is a static method on IntroLayer, that creates a new CCScene and adds a new instance of an IntroLayer to it. This is idiomatic of cocos2d, the framework from which CocosSharp ultimately derives. It's not a convention that I care for particularly, but when in Rome..
The next post will get into the first scene of Meetup Pop, introducing many of the key classes you'll work with when building your scenes in CocosSharp.