In a previous post, I introduced the cross-platform sockets library I recently created for the Xamarin plugin contest. This post will run through how you go about building and publishing such a library using sockets-for-pcl as an example.
![]()
NuGet, Cross-platform, Bait-and-switch? Sounds Complicated!
Not really - much of the overhead, boilerplate and configuration required to build a cross-platform library was made significantly easier thanks to the awesome work of the James Montemagno at Xamarin. He recorded an instructional video and built some awesome Visual Studio templates that let you focus on writing your library and abstractions rather than spend time fiddling with project structure, namespaces and nuspec files. I would highly recommend checking out the video and using the templates; they are what I'll use when outlining the steps involved here.
Before we go any further, I should mention the approach I'm covering below is only required for libraries that need to take advantage of functionality that lives outside your PCL profile. Common use cases are hardware and UI-specific features, with APIs that vary between platforms. If you can write your library completely within your PCL profile, you don't need this approach - skip straight to step four and celebrate. For everyone else, read on!
1. Create the appropriate project structure
Creating a cross-platform library for users that Just Works™ relies on a pattern often referred to as the 'Bait and Switch' trick. There are several blog posts written on the topic that provide a good overview of how it works and what to keep in mind when applying it. In summary, all you need to do is create a NuGet package that includes a PCL project with a particular set of class structures, in addition to your platform-specific projects (with actual implementation) using the same structures, assembly name and version. At package install time, the version of the project that is installed by NuGet will be the one that best matches your target project. By including projects for each of the platforms you are targeting, you ensure that none of them actually run the PCL version's code (which can simply contain empty stubs). However, since your own PCL can still reference the package, you can code against the library in portable code as normal.
As an example, the project structure for sockets-for-pcl looks like the below:
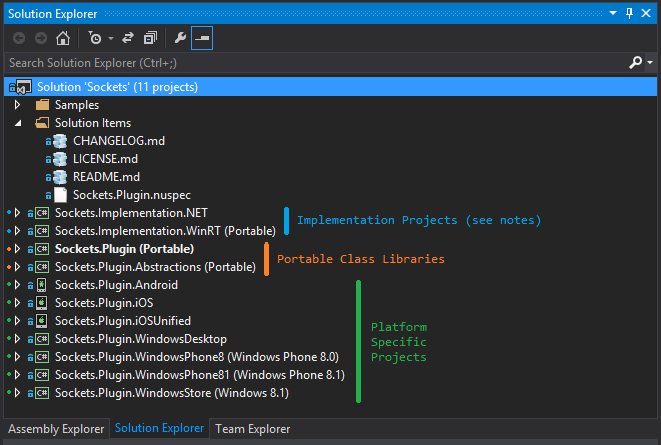
Phew, so many projects! Luckily, the templates that James built will do this all for you, provided you have Visual Studio. If you're using Xamarin Studio, currently you need to do this by hand - and ensure that you modify each project's output assembly name and default namespace to match the 'baiting' project. In the above case, all projects output a Sockets.Plugin.dll and have a default namespace of Sockets.Plugin.
You might have noticed in the above diagram that sockets-for-pcl has two additional projects - Sockets.Implementation.NET and Sockets.Implementation.WinRT. This is because for sockets, there are only two socket APIs that need to be abstracted - the .NET framework APIs (which Xamarin has already mapped to native socket code for iOS and Android), and the WinRT APIs. To take advantage of that, the code for .NET and WinRT is defined once in their respective implementation projects, and the files are then linked in to each platform project. For most cross-platform libraries this wont be the case, and you can just code straight into your platform projects.
2. Stub out your library in the PCL project
For your cross-platform library to work, you need to have your classes and methods stubbed out in your PCL (so that users can reference the package and code against them). As they are going to be 'overridden' by your platform projects and not loaded, you should not be putting any logic or actual code in them. If you want to share code or logic across all your projects, you should add a second PCL project. In the above case, the Sockets.Plugin.Abstractions project holds interfaces common to all projects and referenced by all the other projects. When it coes to packing the NuGet package, we'll include the same Sockets.Plugin.Abstractions.dll in all our platform targets, and the code will be shared between them all.
As for what to stub - You are creating a cross-platform library and so are likely to be abstracting across platform APIs that differ to varying degrees and may not expose functionality in the same way. This typically requires a mapping of classes and methods from the various APIs that you are targeting to your own final API, and potentially some creative design decisions if you want to achieve a good, clean, simple design. I would recommend some thought and a diagram or two (if you are so inclined) to ensure you have a design that makes sense and suits all your platforms.
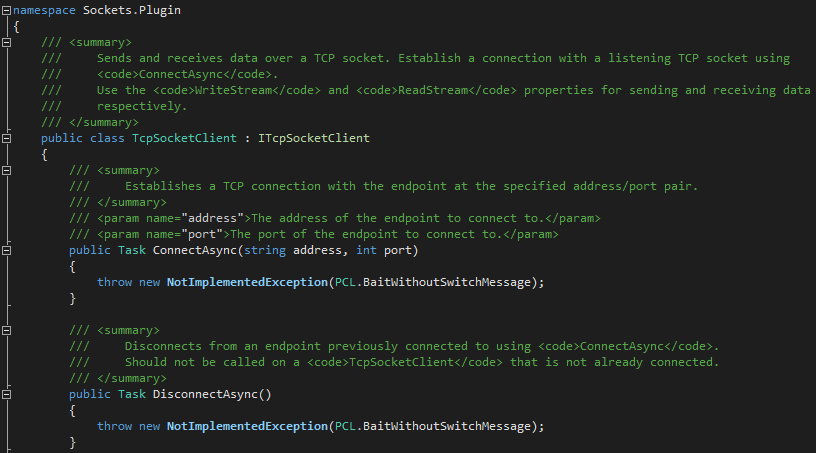
As an additional note, my preference is to throw an exception from all stubs in your PCL project, with a message that lets the user know they need to install your library into their platform projects as well (the only way the exception code will be executed is if the package hasn't been installed in the platform project).
3. Write your platform-specific code
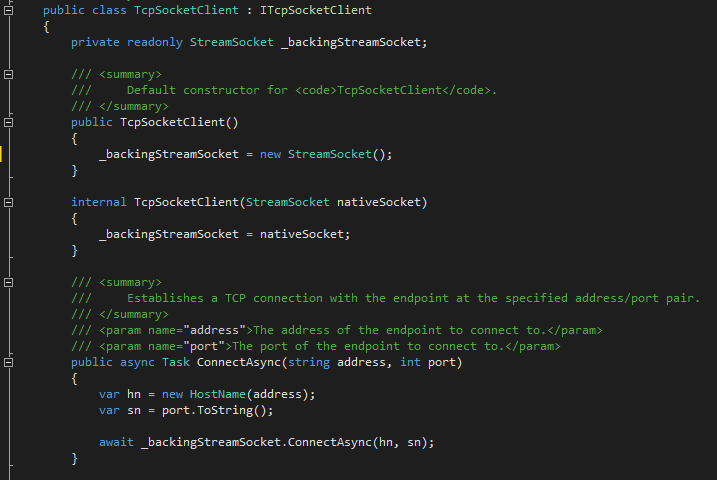
With your PCL project stubbed out, you are ready to write the actual code that will be used on each platform. The amount of code you have to write in your library will depend on the complexity of the underlying platform implementations, as well as the distance between the native implementations and your common API. Keep in mind that while you must at least implement the classes and methods called for by the PCL project, you are free to add whatever other classes, methods and properties you require to properly implement your functionality. These (of course) will not be visible from your PCL project.
You can test your platform-specific implementations by referencing the appropriate .dll files in platform projects, but to test that you've wired up the bait and switch properly, you'll need to build a NuGet package.
4. Pack for NuGet (and Test!) and publish
Fortunately (again), James has you covered if you use the plugin templates for Visual Studio. Along with the the full suite of platform projects, the templates provide a skeleton .nuspec file with practically everything you need right out of the box.

Once you've filled in the missing metadata, you need to get yourself an API key for NuGet (see halfway down the page), and use the nuget setApiKey Your-API-Key command from a shell to set up your current machine. With your key set, and your .nuspec spec'd, you're ready to run nuget pack from the folder that contains your .nuspec and bundle up your package. You'll end up with a .nupkg file which you can then use to check that you correctly "set the bait". If you're missing any key metadata fields, NuGet will complain and let you know. Also, remember your .nuspec should contain references to "Release" .dlls, and so, you need to have built the latest version your solution in Release mode for it to be packed!
You don't need to publish a package to use it for testing. You can add a local repository to your NuGet sources in the Package Sources section of the Nuget Psckage Manager section in Visual Studio's settings. In Xamarin Studio, you click the drop down in the top left corner of the NuGet Package Manager dialog and select "Configure sources". Just pointing a new source to the folder containing your .nupkg is enough. Create a new solution with a core PCL and native platform projects, and install your package into all of them. I'd recommend creating a Xamarin Forms project as it gives you a nice Core + Platform projects structure, and already has the platform projects bootstrapped so that you can write straight into the PCL.

Once you're satisifed that everything works, you use the nuget push command to publish your package on NuGet. The version of the package is based on the metadata in your .nuspec, so incrementing it there will result in a new version being packed for you to publish. While on the topic of versioning, adhering to SemVer is generally considered a Pretty Good Idea.
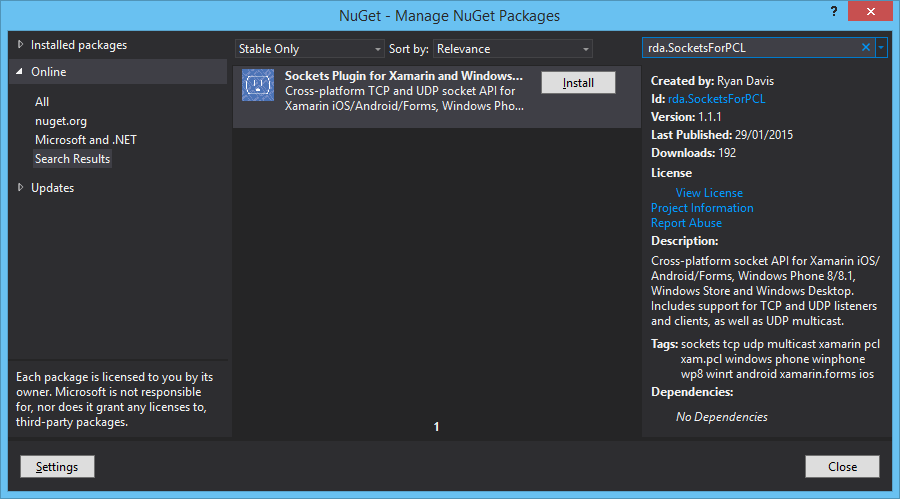
To check it all worked, jump into your favourite NuGet package client and search for your plugin - it should be available instantly!
There it is! And that's what it takes to build and publish a cross platform library for NuGet. There were a bunch of libraries created through the Xamarin competition, searching 'Plugin For Xamarin' should yield good results. Hope to see yours on NuGet soon!
Edit - James is now cataloging plugins here!.